Using the functionality of WPBackery page builder plugin you can easily add all the necessary content on your page and distinguish your site. It includes not only the default modules of WPBackery page builder plugin and its addons, but the unique shortcodes created by DFDevelopement for Native theme users as well.
WPBackery Settings
You may create the pages using WPBackery plugin.
The plugin provides the wide range of various elements and options and allows you to achieve stunning effects on the site.
For more information, you may check the WPBackery Video Tutorials.
To create the pages with WPBackery, you need to install and activate the WPBackery for the site. Find more details on plugin installation in this post.
After this, select what elements you’ll be using and on what pages and posts they’ll be available.
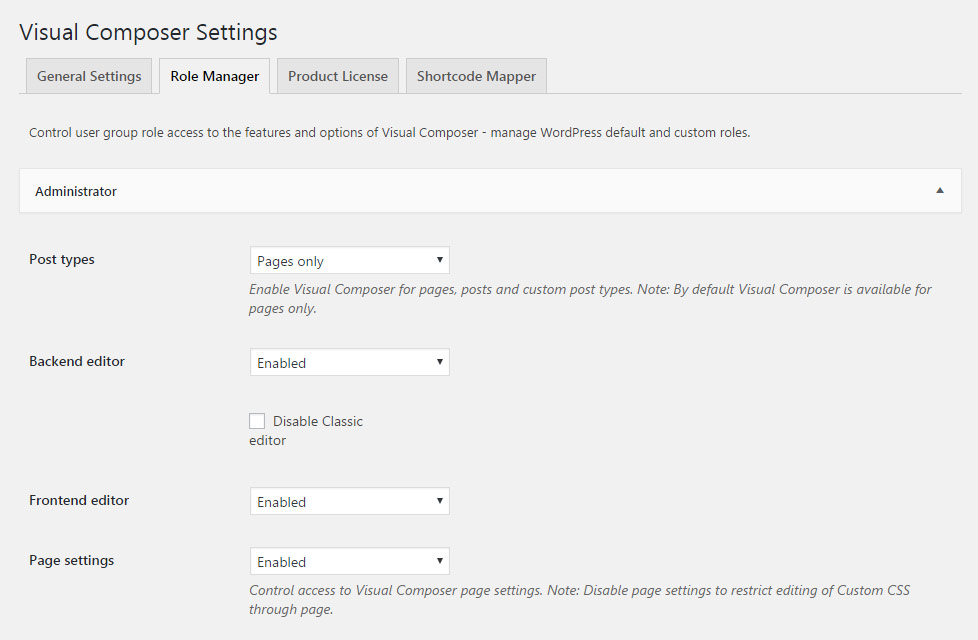
Navigate to WPBackery Role Manager Administrator and check the needed options.

- Post types – select where to display the WPBackery elements. It’s set to Pages only by default. Select Custom post types and put the check marks at all the needed elements: posts – for posts, pages – for pages, product – for WooCommerce products, portfolios, and galleries.
- Backend editor and Frontend editor – enable the needed editors to use them while working on the site.
- Disable Classic editor – set it to Enable to disable classic mode of WPBackery plugin.
- Elements – you may enable all VC elements or select custom ones to display on the site.
- Page settings – allows controlling the access to WPBackery page settings.
Page Editor
After you set the WPBackery, you may proceed to the site building. Below you may check main options when customizing the page.

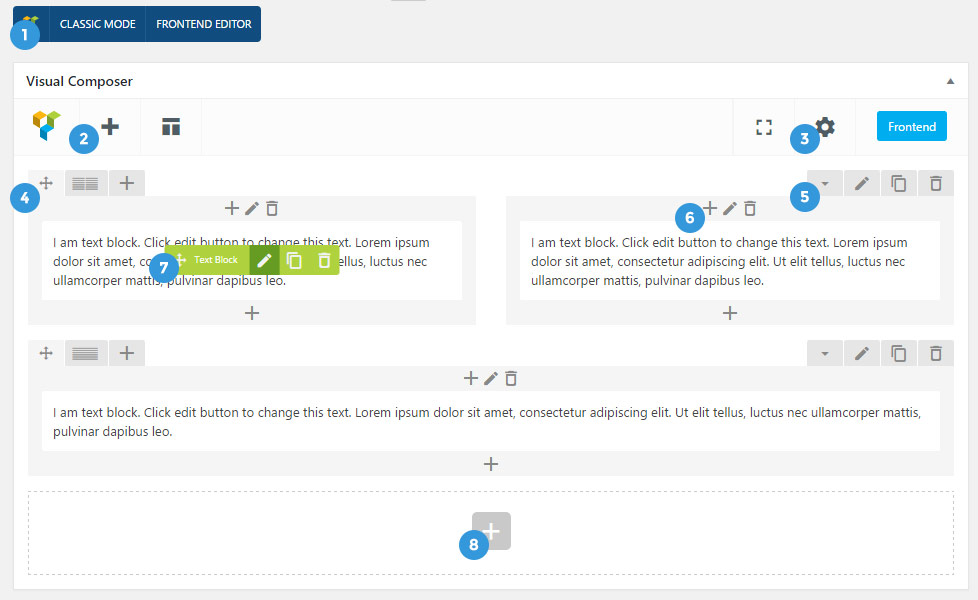
1. Classic mode/Backend Editor – switch to classic mode to display the shortcode of the page. It is useful for quick duplicating of the pages: simply copy the shortcode and insert it to the Classic mode files of the new page. Frontend Editor – allows you to customize the page on its front end making and seeing the changes in real time.
2. Plus button – allows you to add the element to the first row.
3. Custom CSS Box – allows you to enter the CSS code which will be applied to this specific page only.
4. Drag button – allows you to drag-n-drop the row and change its position on the page. Here you can also set the number of columns inside the row.
5. Edit Row button – allows you to edit the row, duplicate it to delete the row on the page. More details can be found in the Row options post.
6. Edit Column button – allows you to edit the column, duplicate it to delete it on the page. More details can be found in the Column options post.
7. Edit Element button – allows you to edit the WPBackery element, duplicate it to delete it on the page. More details can be found in each post of WPBackery element.
8. Plus button – allows you to add the element below the already existing ones.

