Image Layers

Create unique and amazing images representation

Amaze your visitors with the unusual image representation using Layered Images module.

Check the example of the module with this link.

Note, before adding this shortcode on the page, it is important to have the images with equal sizes for proper displaying, i.e. all the image layers need to have the same sizes as the first image uploaded. So the next images will be positioned correctly relatively to the first image.

Watch the video tutorial on Image Layers module creation for more details.

General settings

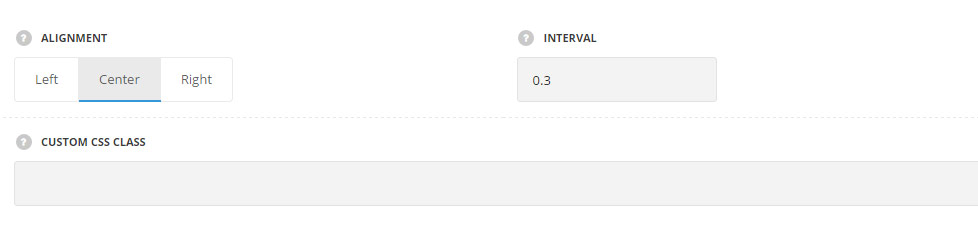
  • Alignment – allows you to align the module horizontally. Left, right and center positions are available.
  • Interval – set the periodicity for image appearing in seconds.
  • Custom CSS class – enter our own unique class name for the item – this is a useful option for those who want to create a specific style. E.g.: you can type custom-style class and then go to Theme options General options Custom CSS/JS Custom CSS field and write your own CSS code with this class to get your own style.

Layers settings

List of layers
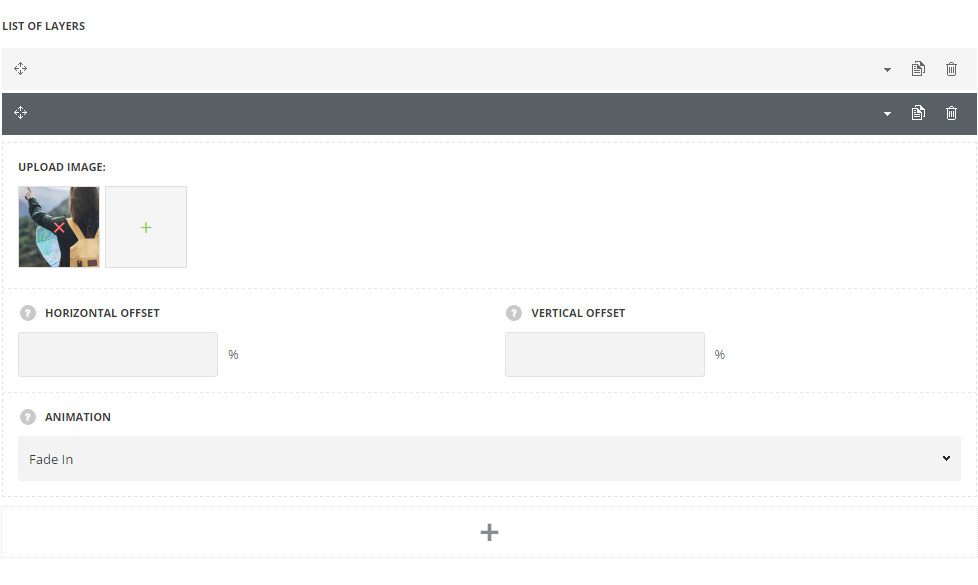
In this section, you can customize the image layers of the module.
By clicking on the arrow down icon you can reveal the whole section to adjust it to your needs. Here you are also able to duplicate the layers, change their order (simply drag-n-drop the blocks) and delete the unnecessary layer as well.
  • Upload image – select image from media library for the Info banner module.
  • Horizontal offset– add the horizontal layer offset in %, for example -100% or 100%. With the offset, you can control the position of the image in horizontal perspective.
  • Vertical offset – add the vertical layer offset in %, for example -100% or 100%. With the offset, you can control the position of the image in vertical perspective.
  • Animation – choose between 14 preset animation effects.
div#stuning-header .dfd-stuning-header-bg-container {background-image: url(https://nativewptheme.net/support/wp-content/uploads/2017/01/hands1.jpg);background-size: cover;background-position: center center;background-attachment: scroll;background-repeat: no-repeat;}#stuning-header div.page-title-inner {min-height: 550px;}#main-content .dfd-content-wrap {margin: 0px;} #main-content .dfd-content-wrap > article {padding: 0px;}@media only screen and (min-width: 1101px) {#layout.dfd-portfolio-loop > .row.full-width > .blog-section.no-sidebars,#layout.dfd-gallery-loop > .row.full-width > .blog-section.no-sidebars {padding: 0 0px;}#layout.dfd-portfolio-loop > .row.full-width > .blog-section.no-sidebars > #main-content > .dfd-content-wrap:first-child,#layout.dfd-gallery-loop > .row.full-width > .blog-section.no-sidebars > #main-content > .dfd-content-wrap:first-child {border-top: 0px solid transparent; border-bottom: 0px solid transparent;}#layout.dfd-portfolio-loop > .row.full-width #right-sidebar,#layout.dfd-gallery-loop > .row.full-width #right-sidebar {padding-top: 0px;padding-bottom: 0px;}#layout.dfd-portfolio-loop > .row.full-width > .blog-section.no-sidebars .sort-panel,#layout.dfd-gallery-loop > .row.full-width > .blog-section.no-sidebars .sort-panel {margin-left: -0px;margin-right: -0px;}}#layout .dfd-content-wrap.layout-side-image,#layout > .row.full-width .dfd-content-wrap.layout-side-image {margin-left: 0;margin-right: 0;}